
If you are just starting your first Libre 3 glucose sensor or have been using a CGM for years, here are over 20 helpful hints and tips.
I have been using the FreeStyle Libre glucose monitoring system (CGM) since December 2018. Here are some questions I had myself before considering the switch from my traditional finger blood gluxoseOneTouch system and some of the answers I came up with or have come to understand using the Libre glucose monitoring system.
Hopefully, this information will helpful to diabetics like me (read my story) that are considering using the Libre CGM diabetes system.
For information about the FreeStyle Libre read my review of the FreeStyle Libre (original post) here. Looking for accessories, a case, or patches for your FreeStyle Libre, find freestyle Libre accessories here.
Here are some common questions and answers that new users as well as long term CGM users like often have about about the FreeStyle Libre Diabetes system and Libre 3 Plus:
- What are the benefits of using an Abbott Freestyle Libre 3 or a continuous glucose monitor (CGM)?
- Do I need to still use my old finger-based glucometer if I use Libre, Dexcom or a CGM?
- How often do I need to scan or read the Libre sensor?
- What do I love the most about my Freestyle Libre
- How frequently do I need to change my Freestyle Libre Sensor?
- Does the FreeStyle Libre Sensor really last 14 days?
- How Well does the Libre App for iOS and Android work?
- Does the Freestyle Libre need your phone to be close or always on to capture glucose data?
- Can I share my Glucose Readings with my family?
- Can I print Reports for my Diabetes Clinic or Health Professional?
- How much does FreeStyle Libre Sensor Cost per month? (NEW)
- Is the FreeStyle Libre System covered under private health insurance in Canada?
- Where do I get the FreeStyle Libre System in Canada?
- Can I use my phone as well as the FreeStyle Libre Reader?
- How large is the Freestyle Libre Sensor?
- Can I use my Android Phone with Freestyle Libre?
- Can FreeStyle Libre warn me if my blood sugar is low?
- How can I stop my freestyle libre from falling off?
- What does the percentage (%) of sensor data captured mean with Freestyle Libre?
- Can the Freestyle Libre get wet or be used while swimming?
- On-Demand Videos on Libre System (NEW)
- Read Questions and Comments by our readers
1) What are the benefits of using a FreeStyle Libre 3 or continuous glucose monitor?
As a diabetic, I am always looking for new or better ways to manage my diabetes and learn about how my body manages the carbohydrates I consume. I have been using a CGM to manage my diabetes since the fall of 2018. Here are some of my observations of the benefits of using a Continuous Glucose Monitor (CGM) from the perspective of an insulin-dependent Type-2 diabetic.
- CGMs are fast and convenient – plus they reduce the number of finger pricks makes glucose testing near painless to test. The ease of simply scanning the Libre gives us an instant picture of where our glucose is. The more convenient, the better the chances we will watch our glucose and they alone lead to better management.
- There are 1,440 minutes in a day. How many times a day do you test your blood glucose? To be conservative let’s say as a typical diabetic we test our blood glucose with finger tests five times a day. Presuming each test is a 5-minute snapshot of our glucose levels, that is a 30-minute window into your diabetes management or less than 2% of the total minutes in a day. What is going on the other 98% of the time?
- CGM can help support Diabetes Biohacking. Biohacking is just a fancy label for better understanding of how well our diabetic bodies can manage glucose, and more importantly how that relates to the foods we eat. The same meal consumed by one Type 2 Diabetic and how well we can use the carbohydrates in that food, will be completely different for each of us. More importantly, how much glucose is left in our bodies between meals will be very accordingly. A CGM allows us to visually see this impact.
- Research has shown that there is a direct relationship with a better A1C number and the number of times you check your glucose a day. The typical FreeStyle Libre user tests their glucose over 10 times a day. How many times do you do a finger test?
Read my entire article on the Benefits of using a CGM For Diabetes Glucose Control here (Read More).
2) Do I need to still use my old finger-based glucometer if I use Libre 3, Dexcom or a CGM based glucometer
Truthfully, I rarely have to do finger pricks. The Libre app will recommend you do a finger-based test if your sugars have had a drastic change; are really high; or very low. At most, I would say I have to do a finger test a few times a month.
It is recommended to fall back to traditional finger pricks with the FreeStyle Libre system if:
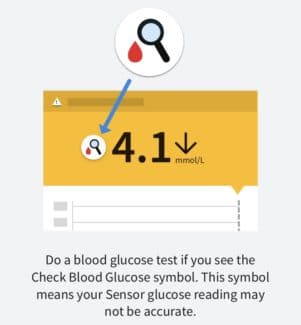
- Your glucose reading indicates a low or going low message; or a high message
- Your trending arrow is rising or falling quickly
- Your sensor cannot provide a reading
- Your readings do not match how you are feeling
The FreeStyle Libre reader can scan both your sensor (fingerless scans) and has the ability to do finger / blood-based scans. Personally, I use my iPhone 8 over the Libre reader (although I have both) – after all, we always carry our phones with us, why lug around a glucose monitor as well. However, I fall back to my old OneTouch for finger tests as 1) I had three units (home, office, and roaming) and 2) I had an existing prescription for the test strips.
3) How often do I need to scan the sensor?
Both the Libre 2 and Libre 3 Plus constantly send glucose data to your phone to give you near immediate understanding and warnings of changing glucose (as long as it’s within range of your sensor). In addition, your Libre sensor holds 8 hours worth of data and then starts to overwrite the oldest readings when you can upload to your Libre App with a quick tap of your arm.
4) What do I love the most about my Freestyle Libre?
Not having to finger prick myself several times a day is a total bonus. However, what I love the most about my FreeStyle Libre are:
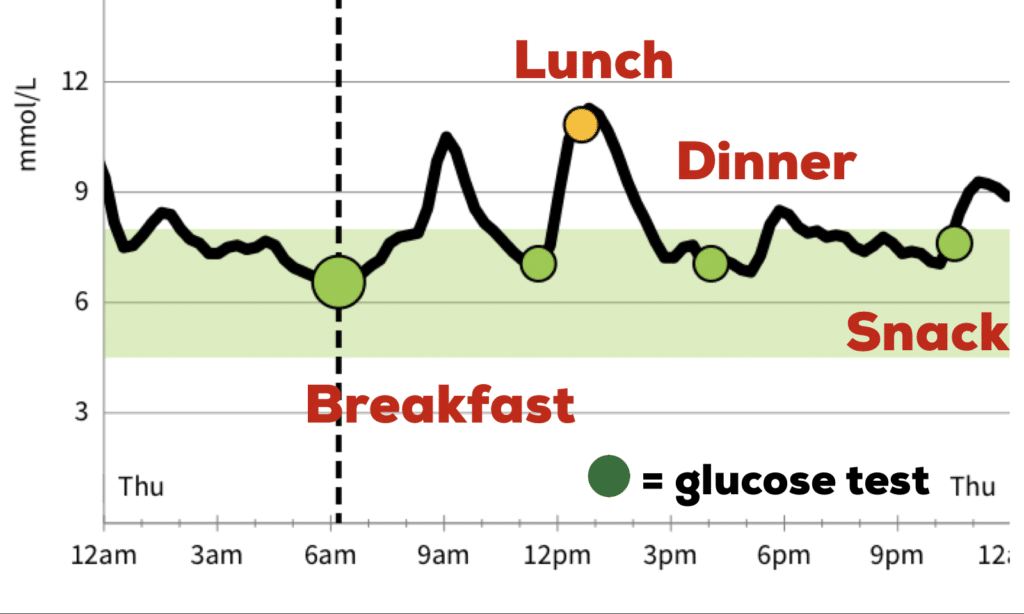
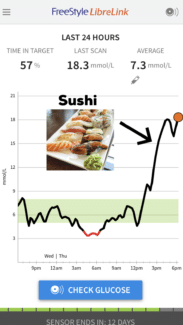
My Libre c the biohacking. How did my body respond to this food or that food? Take the picture on the right as a great example. This picture was pulled from my iPhone Libre App that shows the last 24 hours of continuous glucose monitoring.
For the most part, I was behaving that morning and had great number overnight. Then hello lunch. A group of us from work decided to go for sushi. Even worse – all you can eat sushi. You know what that means right? GORGE!!!!! Look at that spike (and that was with a dose of insulin – it looks like I underestimated the carbohydrate intake with that meal. Needless to say, I know better for next time we decide on Sushi for a work event. It wasn’t until almost 9 PM (9 hours after lunch began that I was able to get my sugars back on tack.
With the Libre system or any continuous glucose monitoring system – pay close attention to your spikes and your gentle waves. How does a protein with your fruits keep your sugars down compared to fruits alone? Do you find you spike more aggressively with one food over another? With knowledge comes power or in our case, control over our chronic illness.
This will be one question I will be bringing to my diabetes clinic – should I have waited until dinner to try to get my numbers back on track or was there a more proactive means.
5) How frequently do I need to change my sensor?
The FreeStyle Libre sensors last exactly 14 days from when it was activated will need to be replaced. Both the iOS and Android phone App and the Libre Reader have a countdown timer in them as a constant reminder.
My only comment is that when the sensor expires, you lose any data between the last time you scanned the sensor and the expiry. It literally self destructs like a spy movie. Well, without the explosion.
6) Does the FreeStyle Libre Sensor really last 14 days
I admit I am only on week 9 (5th sensor) of using the system, however, I have yet to need to remove a sensor before the 14-day mark. That being said, it is winter in Canada and I have a phobia of slipping and falling on ice so my running KM has been limited and the sensor has not been exposed to excessive sweat.
It will be interesting to see how well the sensor holds up in the summer, between sweat, exercise, and just overall life. I do notice that the adhesive does begin to lift away from my skin around the outside of the sensor at about the 10-day mark. There are a few solutions to this:
- Amazon has several pre-manufactured sticky pads that you can place over top. See them at my Amazon Store here where I list some of my favourite Libre Accessories.
- Make your own sticky pad – this is my preferred choice. As an athlete, I have tones of Kinesiology Tape. I cut a small piece, and place it over-top of the sensor for the last 3 or 4 days.
- I have summarized the steps that I use to help prevent my FreeStyle Libre from falling off before the 14-day expiry – Tips to help keep your FreeStyle Libre from falling off.
7) How Well does the Libre App for iOS and Android work
Overall, I have little or no complaints. I do love data – and it is a bit disappointing that the iOS version locks my data away and doesn’t share nicely with other apps.
Remember, the FreeStyle LibreLink app is compatible with NFC enabled phones running Android OS 5.0 or higher and with iPhone 7 (My Libre was a great reason to upgrade my iPhone 6 to an 8) and higher running OS 11 and higher.
Improvements to the IOS version could include:
- Allowing blood glucose readings to be added to Apple Health App. The Health app does not need 100% of the data; I would be happy with the breakpoints of when I have scanned the sensor- similar to what goes into the logbook.
- Ability to import older glucose readings from a text / csv file
- Ability to export glucose readings to a text / csv file. This one would not be needed if the data was in the Health App as there are several other applications available to assist in exporting data from the Apple Health App.
- Downloading the last 90 days worth of data from the LibreView website if you ever reinstall the app. Reinstalling the app loses any data stored on your phone, however, your historical data is safely saved on Libre View.
NOTE: As of October 2019 – the Freestyle Libre is now available for both iOS (iPhone) and Android. An exciting time for all phone users!
8) Does the Freestyle Libre need your phone to be close or always on to capture glucose data?
The Freestyle Libre sensor captures data 24 hours a day without needing your iPhone. Look at the sensor as an independent device – your phone or the Libre glucose meter only needs to be around once every 8 hours to download your stored data. Otherwise, they are two independent devices. That being said you can scan the sensor as frequently as you want.
9) Can I share my Glucose Readings with my family?
One great feature of the App is that you can be held accountable and give a family member access to your results via a small app called Libre LinkUp (Look for it in your App Store).
Libre LinkUp allows up to 20 people to monitor your glucose scans. Unfortunately, you will not see the 24-hour data, however, the user will have access to your LOGBOOK showing when you scanned your Libre Sensor and the glucose reading.
To send a Libre LinkUp Invitation – look for the SHARE link under the dropdown menu on your App and follow the instructions. The user will receive an email with instructions on how to download the Libre LinkUp app and a special code to connect to your data.
Be warned – they can check in on your levels at any time and scold you. You can also share this data with your healthcare provider; if they have registered with FreeStyle.
10) Can I print Reports for my Diabetes Clinic or Health Professional?
The best reports for you and your healthcare team are available through the online companion to the Libre System – Libre View
LibreView is a secure, cloud-based diabetes management system that gives you clear, easy-to-understand reports from many popular Abbott glucose monitoring devices. Your Freestyle Reader can upload to the website via a USB cable – there are instructions on the website. Your glucose readings that have been scanned to your phone are automatically uploaded to the website.
The report can print summaries on the following:
- Glucose Pattern Insights
- Monthly Summaries
- Daily Log
- Snapshot
- Mealtime Patterns
- Weekly Summaries
- Daily Patterns
- Summarize your data by 7 day, 14 day, 30 day, and 90 day averages. You can also view and download copies of your daily trend lines.
- Download all of your data, by 15 minutes time periods, in CSV format
Visit the Libreview website here: https://www.libreview.com/ and login with your Libre username and password you created for your phone app. If you are only using the Reader, can signup on the TOP RIGHT corner the first time you try to access the website.
11) How much does FreeStyle Libre Sensor Cost per month?
Here is a list of the typical cost for FreeStyle Libre per sensor or per month? As I am located in Canada, these costs will be based primarily on what I know locally. However, as information becomes available, I will add the typical cost per month for other countries.
The typical / average cost for the FreeStyle Libre System is Canada are:
- FreeStyle Libre Starter Kit – includes a reader and 2X 14 day sensors – $248 cdn
- FreeStyle Libre Reader – to view your sensor readings or as a backup, if you are using your phone – $54 cdn
- FreeStyle Libre Sensor -Can be worn for up to 14 days – $97 cdn or $194 per month
Personally, I purchase my FreeStyle Libre from my local pharmacy. I prefer to deal with the first name flavor of my home town pharmacist. I pay $102.70 per sensor. For me, this is a small price to pay to support local business over a large pharmacy chain like BayShore, CostCo or Shoppers Drug Mart.
12) Is the FreeStyle Libre System covered under private health insurance in Canada
Yes! Almost 100% of the cost of my sensors is covered by my medical / prescription health insurance provided by my employer. What I did notice is that there is a significant range in costs between pharmacies. I have also read in many user groups that some insurance companies are only covering the Libre System if you use insulin to manage your diabetes. That being said, contact your insurance provider to double- check.
Although you are not obligated to use Abbott’s official pharmacy for the FreeStyle Libre system, they do appear to have the best price for both the sensors and the reader.
When I was trying to activate my first prescription, I was advised by them that my doctor needed to send the prescription directly them despite me already having a paper prescription.
As I already had a paper copy, I simply went to my community pharmacy which was able to get both the sensor and reader in for the next morning (I was my pharmacies first patient to give the system a try.).
The Libre system is available through many Provincially administered Drug plans if you manage your diabetes with Insulin.
13) Where do I get the FreeStyle Libre System in Canada
You can get the FreeStyle Libre from your local pharmacy (mine was able to order in the sensor and the reader) for the next morning.
There is also an official pharmacy for the FreeStyle Libre that is listed on the FreeStyle Canada website. If you are living outside of Canada, check your local FreeStyle website for pharmacy locations.
14) Can I use my phone as well as the FreeStyle Libre Reader
YES! Absolutely — I have both an iPhone and the Libre Reader – and they work interchangeably. However, here is what you need to consider:
- When activating a new sensor, first scan the Libre Reader – then scan your phone
- Both scanners work independently – so if you wanted to aim for 100% of data in both devices, you would need to scan both your phone and the Libre Reader regularly. However, all the data is merged together online in LibreView in Abbotts Diabetes Management website.
- Both Apple Phones (7 or newer) and Android phones with NFC will support Libre. Some andorid phones require you to enable NFC in the settings before Libre will work.
15) How large is the Freestyle Libre Sensor
The Freestyle Libre sensor is discrete and very comfortable the sensor can easily be worn under the most clothing. The Libre sensor is slightly larger than a quarter and about as thick as two coins.
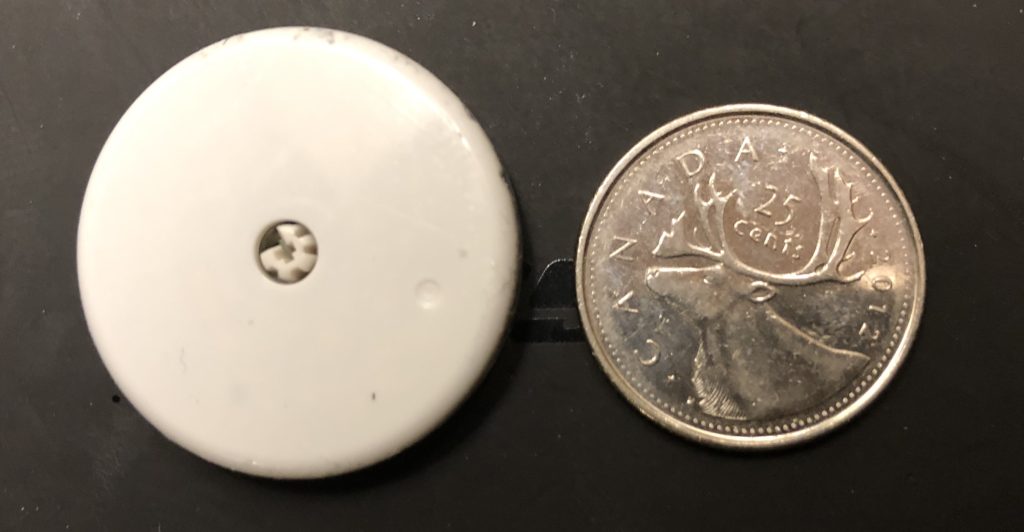
How big is the Libre Sensor? The Freestyle Libre sensor sits on your arm is about the size of a quarter.
16) Can I use my Android Phone with Freestyle Libre
As of the end of September 2019 Freestyle Libre is available for both iPhone (iPhone 7 or newer) and Android. A very exciting milestone. Visit your App Store to download.
In addition to the official Android App, many Android users have also had great success using FreeStyle Libre on their Android phone with the following Unofficial apps. As an iPhone user, I have not tested them.
GLIMP – An Android app for managing diabetes, compatible with Abbott Freestyle Libre, Libre Pro, MiaoMiao and BluCon sensors.
Functionalities:
- Memorize blood glucose levels
- Acquires glucose values from Abbott Freestyle Libre sensor without Abbott reader
- Memorize insulin units, carbohydrates and sport activities
- Remote Glucose Monitoring via Dropbox and Nightscout
- Smartwatch app (requires an NFC-open smartwatch)
Diabetes M – The application tracks almost all aspects of the diabetes treatment and provides you and with detailed reports, charts and statistics. You can send the reports to your supervising physician via email. Diabetes:M also gives you various tools, so you can find the trends in blood glucose levels and allows you to calculate normal and prolonged insulin boluses using its highly effective, top-notch bolus calculator.
Functionalities:
- Smart Watch Compatible
- Bolus Calculator
- Food Database
- Analytical Charts
- Reporting and import / export
- Android and iOS Versions
Nightscout xDrip+ – Attempting to ease the burden of diabetes management through automation technology. Providing proof of concept tools to further research goals and inspire the next generation of systems.
Functionalities:
- Voice, Keypad or Watch input of Treatments (Insulin/Carbs/Notes)
- Visualization of Insulin and Carb action curves + Undo/Redo
- Improved alerts and predictive low forecasting feature
- Instant data synchronization between phones and tablets
- Support for many different data sources
17) Can FreeStyle Libre warn me if my blood sugar is high or low?
As the Freestyle Libre is a NFC (near field communication) device and requires the readings to be downloaded aka tapped from the sensor it is not continuously communicating with your reader or phone. As a result, the Libre has not been designed to warn you of a risk of a hypoglycemic incident.
There are 3rd party apps like Ambrosia BluCon (https://www.ambrosiasys.com) and MiaoMiao (https://miaomiao.cool) that can read the sensor every 5 minutes and send the data via Bluetooth to an app. The BluCon or MiaoMiao app can then notify you of approaching highs or lows so you can react to a hypoglycemic or hyperglycemic event quickly.
That being said there are still huge benefits of knowing what your sugars were doing after the fact i.e. in the morning — did your sugars go too low overnight, so you liver went into overdrive and resulted in a spike your fasting numbers making you reflect on if you “Are we going to bed too high, so no hope in having a good morning fasting glucose reading?”
18) How can stop my Freestyle Libre from Falling off?
Unfortunately, everyone skin is slightly different and your FreeStyle Libre sensor may need some TLC and assistance to last the entire 14-days without being accidentally knocked or fall off.
The biggest tip – do not expect it to last the 14-days without help. Pay attention to the edges around the adhesive — if they seem to be lifting, give it some help with a patch, or kinesiology tape. I have compiled a list of a few tips I have gathered in my 18 months using Libre which can be summarized as:
- Tip 1: Hair is our enemy, start with a blank slate
- Tip 2: Ensure the Libre sensor area is clean and dry
- Tip 3: Pre-Treat the Libre Sensor area with Skin Tac
- Tip 4: Smooth the edges with a Blunt Object
- Tip 5: Wait One Hour Before Getting it Wet
- Tip 6: Pay Attention to Lifting Edges
- Tip 7: Protect your Libre – give it a helping hand
To read the full post on my Tips to help keep your Freestyle Libre Attached for 14-days – check it out here.
19) What does the percentage (%) of sensor data captured mean?
You have to remember that your Libre sensor can store only 8-hours worth of data. If it is longer than 8 hours between the last scan of your Libre sensor, then the oldest data is overwritten and lost. The percentage (%) of sensor data captured is the total number of 15-minute time periods (how often Libre records data to your app) / the total number of all possible time periods.
Using a single day libre data as an example of % of sensor data captured:
If you scanned your Libre before bed at 10 PM and then woke up at 9 AM (11 Hours of sleep) – the data for the first three hours would be lost, with the sensor saving the most recent 8 hours or 1 AM until 9 AM or in other words 8 / 11 hours or 72% of sensor data captured or 88% over a 24 hour period. In your app, this is calculated for 7-day, 14-day, 30-days, and 90-days.

20) Can the Freestyle Libre get wet or be used while swimming?
Yes. Sensors can be worn while bathing, showering or swimming. Don’t take sensors deeper than 3 feet or for longer than 30 minutes. However, officially, the FreeStyle Libre 14 day system has not been tested in seawater.
TIP: If you are going away on vacation with your FreeStyle Libre and feel you will be going in and out of the water extensively. As a precaution, I would:
- Pack kinesiology or rock tape or any other of your favourite patches (See our Libre Amazon Store for examples). This will give you extra protection, albeit, weird tan lines, if you notice your sensor coming loose or an edge starting to lift.
- If feasible, bring a backup Libre Sensor
- As a minimum, bring your finger glucose meter and ensure it is charged and have enough test strips.
21) On-Demand Videos about FreeStyle Libre
Freestyle Diabetes UK has some great on-line resources for the Libre Community. Their webinars are designed to help you get the most out of your FreeStyle Libre system. The videos range on topics that span lifestyle and managing your diabetes to using all the different aspects of the FreeStyle Libre system. Each webinar lasts around 60 mins and always includes a live Q&A session at the end. If you miss our live webinars, you can always watch them On-Demand.
Check out their series of webinars here.
Some of the recent webinars include:
- Understanding exercise using the Freestyle Libre System
- Understanding your diet using the Freestyle Libre System and information sheet
- Understanding your trending arrows using the Freestyle Libre System
- Understanding your data using FreeSyle Libre System and information sheet
22) Do you have more questions about the FreeStyle Libre Glucose reader?
As I come up with more hints and tips about the FreeStyle Libre system I will be sure to add them here. Feel free to leave a comment below with any questions you may have and I will be sure to answer them.