Here are 8 tips I have been using to help stop my Libre Glucose Sensor from falling or being knocked off of the back of your arm since 2018.
8 Tips to help stop your FreeStyle Libre from Falling off
- Hair is our enemy, start with a blank slate
- Ensure the Libre sensor area is clean and dry
- Pre-Treat the Libre Sensor area with Skin Tac
- Smooth the edges with a blunt object
- Wait One Hour Before Getting it Wet
- Pay Attention to Lifting Edges
- Protect your Libre – give it a helping hand
- Keep the applicator, it is great to help press the libre back into place
- What to do if your Libre Sensor Falls Off Early
- Other FreeStyle Libre Resources
DISCLAIMER: I have included links to my Amazon Store where you can purchase many of the items suggested. Looking for accessories for your FreeStyle Libre – look here.
Tip 1: Hair is our enemy, start with a blank slate and shave any hairs
Hair gets in-between the skin & sensor adhesive. This is where your wives or girlfriends can get a bit of pleasure and help remove the hair from a small area on your arm to ensure the Libre or Freestyle Libre 2 Sensor has skin-to-skin contact.
Good clean, dry, skin to skin contact is critical. Bring out the hot wax! LOL, however, a razer works just as well.
Tip 2: Ensure the Libre sensor area is clean and dry
The FreeStyle Libre, Libre 14-day, and Libre 2 work best when the skin is clean, dry, and oil and sweat-free by using the two supplied alcohol wipes. This includes removing any residue left over from your last Libre Sensor. The Lady btw sensor comes with two alcohol cleaning pads. Clean in a circular motion moving from the centre of your Libre area outwards. Be sure to use both alcohol pads and let the area dry completely before proceeding.
If you use Skin-Tac or similar products, you can also try – this unique formula effectively removes even the most stubborn adhesive residue leaving the skin clean, dry, and without a greasy film.
Tip 3: Pre-treat the Libre Sensor area with Skin Tac or similar
If you are finding that your Libre or Libre 2 sensor is not sticking well or causing some skin irritation pre-treat the skin with barrier prep wipes to improve the adhesion of the Libre sensor to your arm.
Skin Tac Adhesive Barrier Prep Wipes has two main uses:
- They provide a tacky surface for you to easily fix any dressings or tapes to (or our Libre), and
- They provide an effective barrier between your skin and those dressings that may be causing irritation.
Tip 4: Smooth the edges around yours Libre with a Blunt Object
After you have applied your FreeStyle Libre, press around the edges of the Libre adhesive with a blunt object such as the end of a spoon. This will help reduce the chances of an edge starting to lift.
I also keep the applicator for the two weeks. This fits nicely around the Libre and can be used to help push down the edges of the adhesive ever few days.
Special thanks to Nerdabetic for this great tip.
Tip 5: Wait one hour before getting you Libre Sensor wet
To give the adhesive the best chance of success – try to wait at least one hour after applying a new sensor before you get it wet. Getting the sensors wet could be as simple as having a shower or going for a swim.
This also includes exercise — let’s keep sweat away from our sensors for at least an hour. Similarly, I do not put on my sensor immediately after my shower. I give my skin a half hour to an hour to dry before I put on a new sensor.
Tip 6: Pay attention to lifting edges of your Libre adhesive
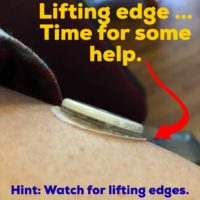
You may notice that although your Libre or Libre 2 is securely attached, there may be some minor lifting around the edges of your Libre Sensor. These little edge lifts are usually the culprit of people ”losing” a sensor early, as it is much easier for a shirt sleeve or oddly positioned door frame to get under that loose edge and OUCH – you pop it off.
It is critical that you pay attention to lifting edges of your FreeStyle Libre or Libre 2 sensor over the entire 14-day period.
At this point (usually around day ten), I occasionally need to add a protective barrier over top of my Libre sensor. (Tip 7)
Tip 7: Protect your Libre – give it a helping hand with tape
Let’s admit it, we catch, bang, or shower our Libre sensors daily. Even the best products need TLC to last 14 days and not fall off. Pay attention to your Libre and Libre 2 sensors and in particular, the edges of the adhesive (Step 6) – I firmly believe this is our responsibility as Libre users.
What to do if your Libre sensor starts to come loose or the edges around the sensor start to lift?
I typically go the simple approach and use a small piece of Kinesiology (i.e. ) over my sensor. However, there are other products available such as , RockDex, or which are designed to cover the Libre and Libre 2 sensor with a protective bandage.
I have also heard other FreeStyle Libre users have had great success with which is a transparent waterproof adhesive wound dressing; similar to what you would have over-top of an IV.
For those that choose the kinesiology tape — I recommend rounding off the edges. This will significantly increase the length of time it sticks. Secondly, trim off any loose edges as they start to come loose.
Warning: Be cautious not to pull on your Libre when removing any patch or tape!
My biggest concern with any of these products is that they adhere to both your arm and the sensor. Fortunately, I rarely need to remove the bandage from the sensor as they have lasted the remainder of my 14-day sensor lifespan. For that reason alone I would never put a patch on day one. I find my Libre stick well for the first 7-10 days before the edges start to lift up. I then throw a patch or tape over-top for the last few days to more protect that one little cover where we undoubtedly will get a shirt sleeve or door frame caught underneath.
If you do need to remove the patch or tape before your sensor has expired – I have found that slow and steady wins the race. Be sure not to tug or pull on the sensor.
Hint: Try placing a small piece of gauze between the patch and the Libre or Libre 2 sensor. This should help with reducing the amount of stick to the Libre and assist when changing the patch before your sensor is due to be replaced
No matter what you choose, the key is to help keep the edges of the Libre sensor secure and protected.
Tip 8: Keep the applicator, use it to press the edges of the adhesive back down
Keeping the applicator between new sensors. For starters, I reposition it overtop of the Libre. It does a great job to press down lifting edges of the adhesive. Warning though, do this with caution and care as you do not want to accidentally know the sensor lose.
Have I been successful with these tips? I will let you decide, however, I have been using Freestyle Libre Glucose system for 4 years and have only had an issue with one sensor that accidentally got caught in my shirt as I was taking it off, one Libre that was knocked off wrestling with my son, and a third in a hot tub (although I feel it was coincidence).
Contact Abbott Diabetes Care for a Warranty Replacememnt
Contact your local Abbott Customer Service Centre if your FreeStyle Libre, Libre 14-day, or Libre 2 sensor for any of the following reasons:
- Your Sensor is routinely off by more than 20% when compared to a blood glucose test. Remember, you need to test your blood and then your Libre with a scan 5 to 10 minutes later to accommodate the lag between interstitial fluids and blood glucose.
- You are getting errors when trying to read your sensor. If you have a second device, ie a phone, or the Libre Reader. Test both to help determine if it is the sensor or your reader device that is acting up.
- You knocked off your sensor
- Your sensor fell off
The FreeStyle Libre representative will discuss and let you know what replacement options, if any, are available to you.
Here are the local contact numbers for Libre Customer Service / Support:
- Canada: 1-888-205-8296
- USA: 1-855-632-8658 (available 7 days a week 8 AM to 8 PM Eastern Time; excluding Holidays)
- United Kingdom: 0800 170 1177 (Monday to Friday between 8:00 AM and 8:00 PM, Saturday 9:00 AM to 5:00 PM (excluding Bank Holidays) or ONLINE (Click here)
Other FreeStyle Libre Resources
This is just one set of helpful tips from one Libre user to another. Be sure to check out a few resources that may be helpful to you and your body type. Here are a few places to start:
- Accessories, Cases, Patches and More for the FreeStyle Libre – A list of helpful accessories for your FreeStyle Libre and Libre 2 scanner and sensor. Patches, cases, stickers and adhesive patches and guides to help your Libre last the 14 days in style.
- Abbott FreeStyle Libre Sensor Adhesion Guide – a few very general tips from Abbott themselves to help keep the Freestyle Libre lasting the 10 to 14 days
- Freestyle Libre | Official Learning videos and Tips – Abbott, the makers of the Freestyle Libre diabetes glucose monitoring system, has released a series of education and learning videos to help us get the most out of our continuous glucose monitoring system (CGM).
Closing Remarks
These steps may not work for everyone as our skin is different. However, as I opened – using these seven tricks, I have never lost a Libre sensor. The one and only sensors I hav lost were to human error as I skipped step 6 as I knew or didn’t check if my sensor edge was pulling loose.
Send me your Freestyle Libre hints and tips!
I would love to hear any other hints or tricks from people. If you are a marketer, please do not provide comments, however, feel free to drop me a message on our contact page.
For convenience, I have these items and a few other options listed in our Amazon Store and our accessories for the freestyle Libre page – free two-day delivery, movies, books, music, and more with Amazon Prime.
